0x04 // Chatting via PuTTY over a Second Phone Line


While you could just follow along and wait for my dialup experiences to come online, there's really no current way for someone to test their own projects without a second phone line, ATA and modem. So here we go.
Look back at 0x01 and 0x02 for my recommendations for equipment. Add a second US Robotics 3453C modem and DB9 to DB25 cable to that shopping list. That hardware and 90% of the configuration will carry you forward.
With the hardware for two lines, this is how we'll set it up. It's not a strict configuration, but if you have been following along these changes will slot right in to your existing setup.
Sub Account Creation in VoIP.ms:
Login to VoIP.ms and navigate to Sub Accounts > Create Sub Account. We will be creating two new sub accounts (for free). Your main account could still be used, but this will allow for cleaner configurations going forward.
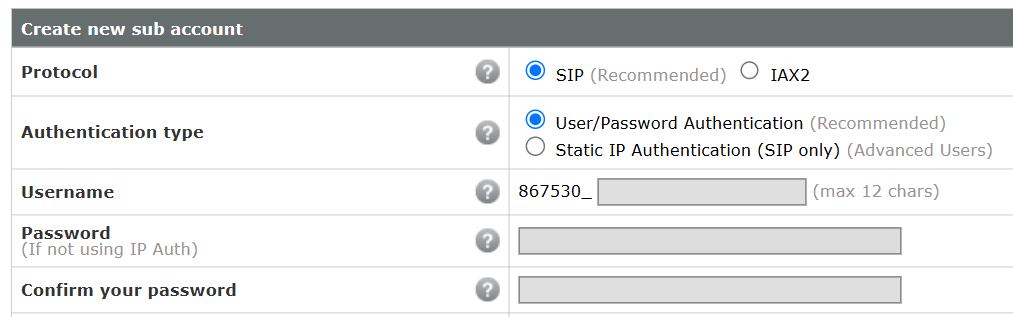
Fill in Username, Password and save that information for later. I made my usernames my main account number suffixed with _line1 and _line2 respectively but feel free to use whatever naming convention makes sense to you.
For CallerID Number select Use one of my DIDs and select a number for the line. It can be the same number for both lines. It's probably already filled with the correct number if you only purchased one as in my previous writings.

Lastly, under Allowed Codecs, just G.711U should be selected as in previous configurations to force the best protocol choice for analog modems over VoIP.

You can now click Create Account. Repeat this process once more for the second line. Sub Accounts > Manage Sub Accounts should now look similar to the following:

Reconfiguring the Grandstream:
The Grandstream ATA(s), whether you have one HT802 or two HT801 devices, will now be reconfigured. Under Port Settings > FXS Port change the SIP User ID, Authenticate ID and Authenticate Password to the new accounts you created in VoIP.ms.

Do this twice, once for each FXS Port, whether it be on the same ATA or a different ATA. Status > Port Status should now look like the following on a HT801. On an HT802 you would see FXS 2 listed as well:

A PuTTY to PuTTY Connection:
With both your modems connected up, we will use PuTTY to make both an outbound and inbound call at the same time to test the configuration. These modem commands will be the basis for the code we use coming up so it would be good to familiarize you with them now.
First recall how we connected with PuTTY the last time:
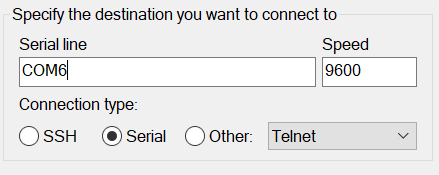
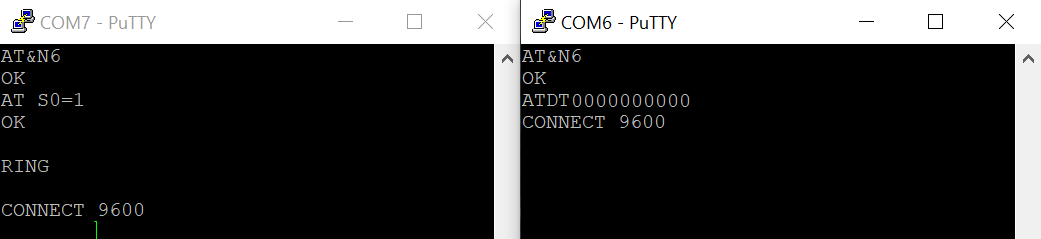
Open the first PuTTY session on you first serial port (e.g. COM6) and type the following in the window:
AT&N6
AT S0=1
And in the second PuTTY session on your second serial port (e.g. COM7) type the following, being sure to replace the placeholder number with your own:
AT&N6
ATDT5555555555
So what's happening here? AT&N6 initializes the modem for 9600 baud in both cases. AT S0=1 tells the first modem to automatically answer incoming calls and the ATDT command on the second modem then dials out to the number you specified. Since VoIP.ms allows for a minimum of two lines on the most basic account you are essentially calling yourself on one line from the other.
Once CONNECT appears you are good to type text in either window. Without additional configuration you won't see the text appear in the window you type in, only the window it's received. With some configuration around "local echo" it would work as a basic chat interface. Play around with it! It's rudimentary, but this was actually a method people used to communicate back when the dinosaurs still roamed the Earth.
And with that, we're setup to resume development. I plan to release these articles on Fridays, but as is life, there will be some variation. I have some working Free Pascal code for the next article, so that should post as scheduled. Until then, if you're not subscribed, consider signing up. The first tier is free but I'd appreciate your support at higher levels! More will be added soon. Adios.